Backyard Mechanic Basics for the C5
By Al Engel
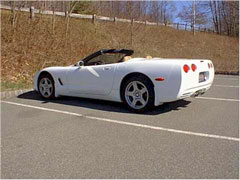
I know I’m a little different then a lot of folks… just ask my wife! Most people, when they take delivery of a shiny new craft, go for a drive! I just took delivery of my ’99 C5, ragtop, 6 speed, drove the 5 miles from my friendly, local Chevrolet dealer to my house, into the garage, and proceeded to take the car apart….. normal?
OK, let me rationalize my actions. I’m the kind of guy who reads the directions…. owner’s manuals, and technical stuff. To me, why something works, and how it works, is as important and fun as the mere fact that it works at all! In working on my new C5, I learned some things that other owners may benefit from.
Getting it up! The C5 comes from the factory with "run flats". That means, no spare tire, no jack, and no jacking points identified as to where it is safe to lift the car. According to the Shop Manual ($110 dollars please), the proper points for a four point hoist lift are defined buy the "chain down holes" on the frame rails of the car (the approximate same locations as the jacking points on the C4). The plastic body of the C5 wraps down the side of the C5 and rolls under the car, covering the frame rails, with small cut outs in the plastic rocker panels for access to the chain down points referred to above. The problem is, a floor jack (or four point lift) will have lifting pads larger than the cutouts that uncover the frame rail upon which the lifting pad will make contact. This results in the lifting pad resting on part of the body plastic (not the steel frame) and crushing the plastic between the frame and lifting pad. Now, I’m sure most people will never see the resulting damage. You would have to get down on you hands and knees to see it…. but, I would prefer not to have this damage on my car.
The Hockey Puck Solution: I have found that a hockey puck (4 of 'em) work just fine as a buffer between the lift pads (or jack stands) and the frame. They are just the right size to span the chain down hole in the frame, small enough to fit in the plastic body’s cut out area, and stiff enough not to deflect. Result…no body damage! In the event the car may have to be hoisted by someone else away from my home, I keep the hockey pucks in one of the floor compartments in the trunk of the C5. (Yes, all of you C2, C3, and C4 owners… the C5 rag tops and hard tops come with a genuine "TRUNK").
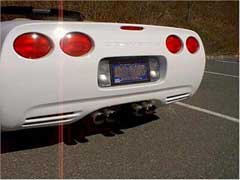
OK, now we have the car up in air. Time to get rid of that ugly, restrictive, stock exhaust system. I chose an all stainless steel, cat-back exhaust system from Corsa. Installation was easy and straight forward, if you know a few tricks.
1. Get the car up high. To get the stock exhaust off in one piece, you will need to have the tips of the stock exhaust at least 4 feet off the floor (a little higher then the old scissor jack will allow). Make sure the care is safely supported, you will be working under the car, and if it should slip, you will make an unsightly stain on the bottom of a very nice car that your estate will be attempting to sell.
2. Remove the rear suspension sway bar. Easy job, six bolts and it’s off. The bolts holding the bar ends to the sway bar links are a little tricky. Put a wrench on the nut, and it will just spin. The stud must be held fixed with a T-40 Torx socket inserted in the end or the stud. A crescent, or box end wrench, can then be used to remove the nut.
3. Now remove the two bolts attaching the muffler & exhaust pipe from the cats. Discard the old gasket that will fall out. You will want to use a new one.
4. With a long extension, access the two nuts between the bumper cover and muffler. Remove these nuts and the muffler will fall free. Now just rotate the muffler and attached tail pipe down and extract the whole assemble. It will now become apparent why I specified the car to be "four feet in the air". If you chinced out on the height, get out the cutting torch…. the assembly will not clear the half shafts if you did not leave enough room to rotate the mufflers down far enough.
5. Remove the rubber and steel hangers from the old mufflers and slip them onto the new mufflers.
6. Install the new system in reverse order of that use in removal. Make sure you use "anti-seize compound" on any stainless steel nuts and bolts. Stainless steel does not slip well on itself, and you will not achieve acceptable tightening torque without the use of anti-seize compound.
Total time on the job…. about one hour. Before I started the project, I painted the shiny new, stainless steel system with flat back, heat resistant paint (except for the polished tips). I didn’t want to have the two muffler cans shouting out gleaming stainless steel from a rear view of the car. Results…. looks great, sounds terrific, too new to run the car up in the RPM range to assess better breathing, but the claims by some aftermarket installers are touting a pick up of 20 HP at the rear wheels (that’s +25 at the flywheel). Corsa is the supplier of exhaust systems to GM Specialty Vehicles. Corsa exhaust systems were used on the Indy pace cars (the "real" ones, not the replicas) and the Rolex 24 Hours of Daytona pace cars. There are two version of the Corsa exhaust for the C5. The "Touring" and "Indy" models. Both provide the improved exhaust flow (45% more flow capacity claimed by Corsa). The touring version is relatively quite, the Indy version is LOUD. I have the Touring version…. I just wanted the horsepower gain, not the noise.
How about a radar detector? I have been driving with radar detectors in all my cars since the late 70’s. Remember the "Fuzz Buster"? I just feel naked without the warm glow of the detector’s pilot light. The model I selected for the new Vette was the model 7500 Escort. A 12V, powered, all band + laser detector. On the new Vette, it mounts nicely just above, and to the left of the rear view mirror with the provided suction cup mount. Very non-intrusive. The optional, straight (don’t get the coiled one), hard wired power cord can be placed under the plastic window frame molding and run in a similar manner down the "A" pillar.
The power source for accessories on the C5 is in the vicinity of the instrument panel fuse box, located under the passenger foot well. Remove the foot panel (two toggle levers), and get your head under the passenger dashboard. Please note: (It is best to do this procedure without a passenger in the right seat). You will be looking at two boxes. The one on the right is a black rectangle, under which are the fuses, and relays. Leave it alone. What we are looking for is not here. To the left is a larger metal box. This is the Body Control Module. Leave that alone also. Now look at the top left corner of the cavity where both these boxes reside. You will see a gray connector clipped into the inside corner with three wires (black, orange and yellow) going in, and out. Use a wide blade screwdriver to pop the connector out of the side of the recessed cavity to which it is attached. This will allow you to unwrap the tape from the end of the terminated wires exiting the gray connector. This connector is the "Accessory Power Connector", and it is specifically provided by GM to connect aftermarket power accessories to the car’s electrical system. That is why it is there! Power for radar detectors, CB radios, cell phones, etc. can be accessed from the Accessory Power Connector. The black wire exiting the connector is "ground (-)"; orange is "battery (+)" and is always "hot"; and the yellow is "switched (+)" that is "on" when ACC or RUN is selected with the ignition key, and "off" when key is in the OFF position. As always, if you’re going to work with the electrical system of any car, boat, train or plane, disconnect the (-) cable from the battery before you make any electrical connections, cuts, splices, etc. Very bad things happen when you accidentally ground a + wire in 12 volt systems! I connected the Escort to the ground and the yellow, switch + wires. With this type of connection, the detector is "on" when the motor is running, and "off" when the car is not in use. Nothing additional to turn on or off.
OK, Exhaust installed, Radar Detector ready to detect, it’s time to go for a drive! If you have followed all these instructions, its time to take a shower, change into some clean clothes, put the top down, and enjoy your C5 for the purpose it was designed…. driving it!